from Crypto.Cipher import AES from Crypto.Util.strxor import strxor from binascii import hexlify, unhexlify
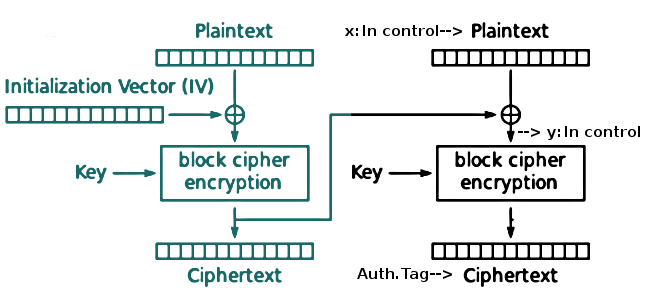
defsign(key, message): try: ECB = AES.new(key, AES.MODE_ECB) messageblocks = [message[i:i + 16] for i in range(0, len(message), 16)] tag = ECB.encrypt(messageblocks[0]) for i in range(1,len(messageblocks)): tag = ECB.encrypt(strxor(messageblocks[i], tag)) return hexlify(tag) except: print("\nYou can't sign that way! No padding done here boy!") exit()
if __name__ == '__main__':
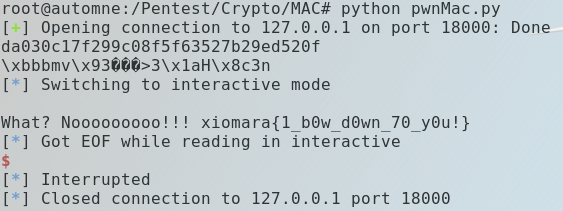
flag = "\nWhat? Nooooooooo!!! xiomara{1_b0w_d0wn_70_y0u!}" key = b'YELLOW SUBMARINE' print("\nYou wanna challenge me? You trying to break my signing scheme? LOLLLLLL ><") print("Anyways, try hard for that boy!") print("Press 0 to get your message signed and 1 to submit a forgery...Pffff! Seriously?") while(True): try: inp = raw_input("\n") if(inp=="0"): hex_msg = raw_input("\nGimme your hex encoded message\n") msg = unhexlify(hex_msg) hex_tag = sign(key, msg) print("\nThere you go! Here's my hex encoded tag!") print(hex_tag) else: print("\nOh! So, you are up for it?") print("\nAlright! Gimme just two different hex encoded messages that could sign to the same tag!") msg1 = unhexlify(raw_input("\nMessage #1: \n")) msg2 = unhexlify(raw_input("\nMessage #2: \n")) if(msg1 == msg2): print("\nI am not fool boy! Get back and do the job like a grown up!") exit() if(msg1 != msg2 and sign(key, msg1)==sign(key, msg2)): print(flag) exit() else: print("\nOops! They don't match! Told ya! Hard work my son...Better luck next time!") exit() except: exit()
这道题目提供出来的代码也就是下面的关键签名代码:
1 2 3 4 5 6 7 8 9 10 11
defsign(key, message): try: ECB = AES.new(key, AES.MODE_ECB) messageblocks = [message[i:i + 16] for i in range(0, len(message), 16)] tag = ECB.encrypt(messageblocks[0]) for i in range(1,len(messageblocks)): tag = ECB.encrypt(strxor(messageblocks[i], tag)) return hexlify(tag) except: print("\nYou can't sign that way! No padding done here boy!") exit()